The Golden Years

All you have to do to find the benefits of Golden paste, is Google or Bing it!

It’s good for you, and your pets.

http://turmericlife.com.au/start-here/

RawSpiceBar: Shop 3, 6, & 12 month spice gift plans

RawSpiceBar

This recipe may be used for humans as well as animals.

Ingredients:

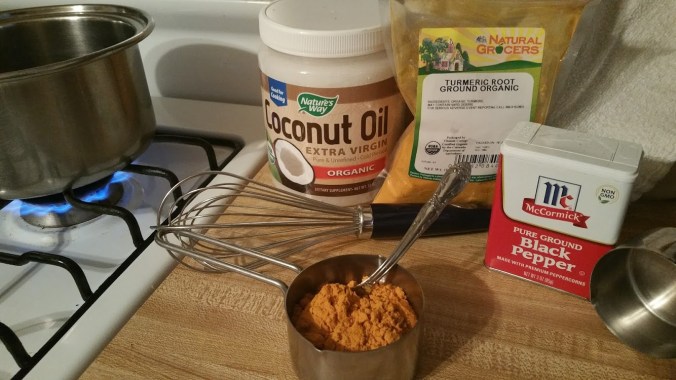
  • 1/2 cup (125 mls/60gms) turmeric powder
  • 1 cup water (250 mls) PLUS 1 cup water in reserve, if needed
  • 1/3 cup (70 mls) Raw/Cold Pressed/Unrefined Coconut/Flaxseed-Linseed Oil, Virgin/Extra Virgin Olive Oil
  • 2-3 teaspoons freshly ground black pepper

turmeric-golden-paste-doug-english-turmeric-life

Please be sure to get some freshly ground black pepper. I used what I had, but I will get some for the next batch.

20161122_072812

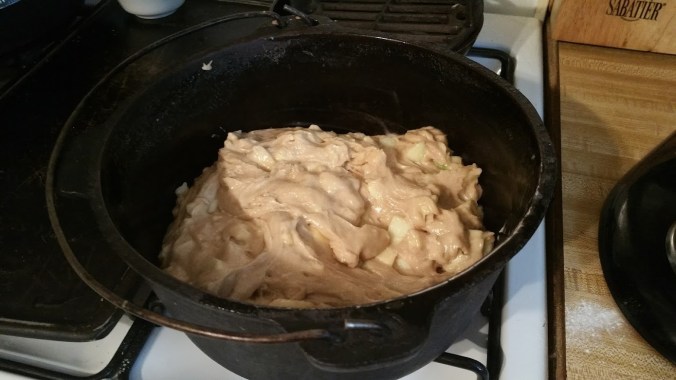
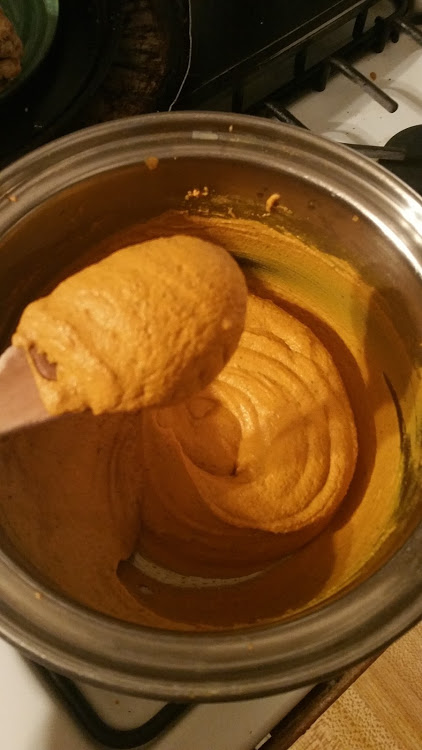
Combine 1 cup of water with 1/2 cup turmeric in a saucepan over medium heat.

20161122_072949

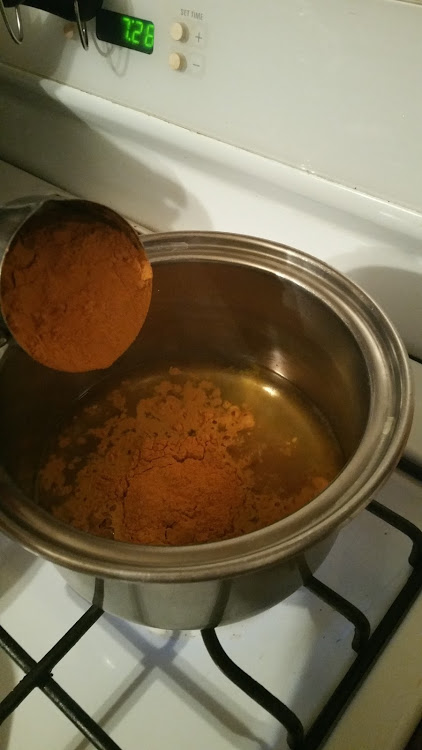
With a whisk, mix the turmeric into the water, to create your paste.

20161122_073003

Have that extra cup of water handy, because in my experience, the paste thickens and clumps up very fast! I used 1 & 1/2 cups of water for my paste.

20161122_073040

Cook the paste for a few minutes, whisking, till thick and smooth.

Measure your coconut oil, or other oil: 1/3 cup.

20161122_073319

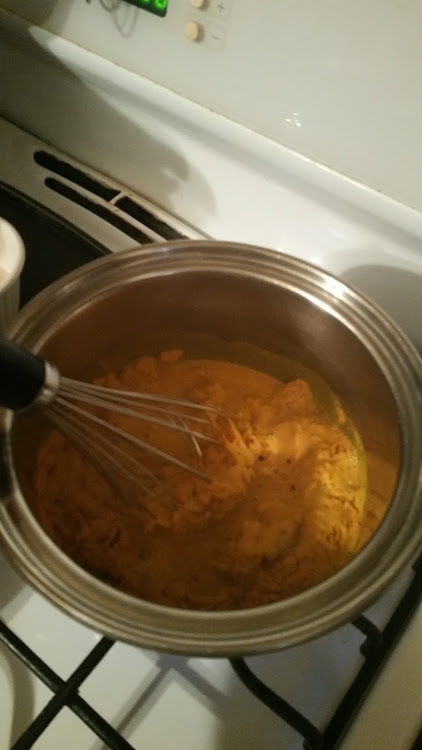
Remove the saucepan from the heat. Add the oil and whisk till smooth.

20161122_073411

RawSpiceBar: Free Shipping On All Orders!

20161122_073447

Add your freshly ground black pepper to the paste and whisk it it.

20161122_073534

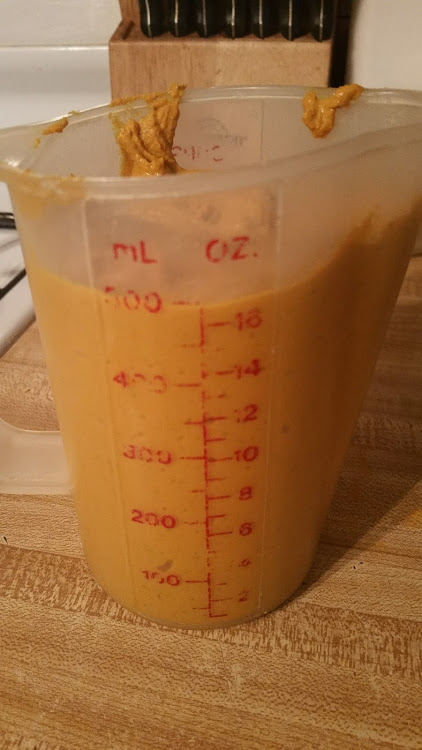
Your Golden Paste is done and ready to eat. This recipe made 2 cups of paste.

Be sure to store what you can’t use within 2 weeks, in the freezer. One great way to do this is put 1 tsp into rubber candy molds and freeze, then pop out and store in a baggie till needed.

20161122_07363020161122_074026

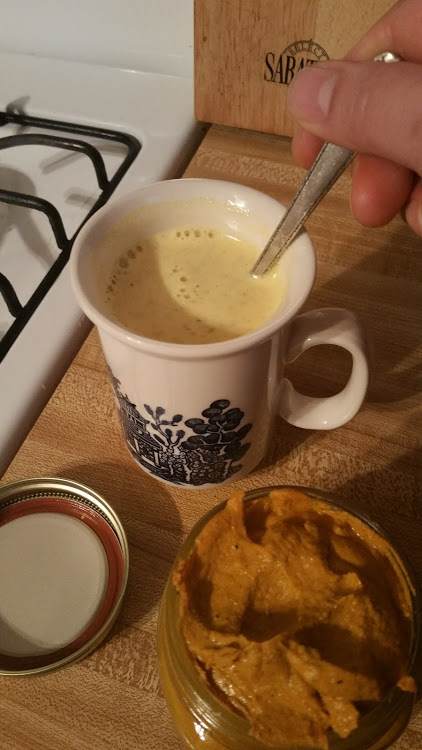
I put about 2 tsp in hot milk to make Golden Milk. You should give this a try! Add a dash of cinnamon or cocao powder to your paste, to taste.

20161122_080705

I love this stuff, I even prefer it to coffee in the morning!

20161122_080748

http://turmericlife.com.au/

RawSpiceBar

My version of Chef Billy Parisi’s Apple Cake

20161112_142550

Apple Cake Recipe with Oatmeal Streusel

This looked so fabulous to me this morning, so I decided I would give it a try. As I began to gather the ingredients, I realized this was going to be a typical Deana baking fiasco.

I love to cook, I just don’t like to shop. When I want to make something, and I am missing a few ingredients, I scour my cupboards and frig for substitutions that will suffice. Sometimes (most times) I add extra things that I like. Once in a while it works, and today was no exception. Billy‘s recipe calls for sour cream, of which I had none, so I pulled out my last lemon cream pie yogurt. Have you seen the prices on Honey Crisp Apples?  Highway robbery! 2 Gala’s and 1 Granny Smith would have to do. I didn’t have Almond meal for the streusel, but I did have Bob’s Red Mill Natural Foods Flax seed meal, and thought the nutty favor would be perfect.

bobs-red-mill

I had planned on making a batch of granola today, but I didn’t have enough oats for that so the whole oats, shredded coconut and pecan halves all went into the streusel instead.

20161112_125947

I always have self-rising flour in stock, so I used that in place of the all purpose four and baking powder. I left the salt out too, since I had bought salted butter to make rice krispies treats. The batter came out so rich and creamy!

363

I greased the cast iron dutch oven with coconut oil, and spooned the thick batter into the pot. I had the streusel ready, and crumbled it over the top, completely covering the batter.

20161112_130353

I baked it at 350 for 30 minutes before I checked the batter, and it was not done. i put 10 more minutes on the timer and checked it again, still not done, but after another 10 minutes, I took it out and let it rest on the stove. For that final 20 minutes, I  put my flat cast iron skillet under the dutch over,  because I was worried that the bottom would over cook.

20161112_142601

It turned out perfect, I was a little surprised, actually. The topping was perfectly toasted and crunchy & delicious. The bread of the cake was so moist and soft and perfectly cooked. the bottom was not burned! Yeah 🙂 It turned out so good! The one thing I didn’t make was the caramel drizzle and I didn’t have ice cream, but it was still delicious, and there’s lots left and the weekend’s not over yet 😉

20161112_184922

Please visit Billy’s website for the complete recipe: http://www.billyparisi.com/apple-cake-recipe-oatmeal-streusel/

Like Billy Parisi’s Facebook to see his posts!

This cake is definitely Holiday Gift-Worthy. Make up the caramel sauce, and put it n a pretty little jar with a ribbon and the recipe on a card. Viola! Merry Christmas ❤

20161112_185328

Zucchini Pizza Bites

I’m notorious for making what I want, with whatever I have. If I’m missing an ingredient in a recipe, I’m more apt to improvise, than run to the store to get what I’m missing.

Many of you, (known or unbeknownst) have eaten my “Clean out your refrigerator” concoctions and lived to tell the tale! My “Clean out your refrigerator” Cookies were a massive hit, but when asked for the recipe, all they got from me was a blank look…..

I’ve got to start writing it down, or, better yet, take pictures of what I’m doing.

Anyway, I shared one of Country Living Magazine’s Facebook posts on my wall, https://www.facebook.com/dinanana/posts/10207085009706748?pnref=story

the “Best Zucchini Pizza Bites Recipe”  https://www.facebook.com/CountryLiving/

http://www.delish.com/cooking/recipe-ideas/recipes/a43638/mini-zucchini-pizzas-recipe/

I didn’t have Marinara sauce, or Mozzarella cheese, so I went spelunking through the cupboards and found one small can of tomato sauce, garlic powder and sweet basil, and cheddar.

I did, however, have the most delicious garden-fresh zucchini from Mandujano Brother’s Produce.  https://www.facebook.com/Mandujano-Brothers-Produce-110654835624738/

After having nothing more than a peanut butter sandwich all day, this really hit the spot!

The man of the house is out getting Shelby’s hooves trimmed, so I’ll probably need to make more because I ate most of these already! He may want something a bit more “robust” as well, we’ll see what else is in the refrigerator 😉

YUMMY


Blackberry Macadamia Cake

Author: Worth Every Chew

Ingredients: 1 3⁄4 Cup crushed Macadamia Nuts

1⁄4 cup cornstarch, 1⁄2 teaspoon Sea Salt, 1 teaspoon baking powder, 1-2 tablespoons cinnamon, 1 cup fresh blackberries, 1⁄4 cup coconut oil, 3 Tablespoons maple syrup, 1 Whole Egg (1 Chia Egg for vegan option), 2 pinches of LOVE

Instructions: Preheat oven to 375*F/190*C/Gas Mark 5

Mix crushed nuts, arrowroot powder, sea slat, baking powder and cinnamon together in one bowl. Mix Coconut Oil, Egg and Maple Syrup in another bowl, Then mix contents of both bowls together. Now, gently fold in the blackberries. Line a round cake pan with parchment paper and press mixture onto paper in the pan. Bake for 25-30 minutes or until cake is set. Allow to cool before slicing. Enjoy with someone you LOVE

Notes: If you would rather use brazil nuts I think they will work just as well as macadamia nuts. Lately, macadamia nuts have been scarce at Whole Foods so brazil nuts would be my second choice.

Source: Blackberry Macadamia Cake

Inside Out Chocolate Nut Butter Cups

Nut butter and chocolate,  what’s not to love ?!? I predict that your kiddos will fall in love with these little bites of Heaven! Not only are these healthy, refined sugar free, diary free, keto and vegan they are a lot of fun to make too. If you are nut free, you can substitute sunflower…

Source: Inside Out Chocolate Nut Butter Cups

Vegan Recipe Resources

avatar

http://www.forksoverknives.com/

http://potatostrong.com/recipes/

https://happyherbivore.com/

https://cookingwithplants.com/

http://engine2diet.com/

http://www.onegreenplanet.org/

http://minimalistbaker.com/

http://www.brandnewvegan.com/

http://fatfreevegan.com/

http://www.thevegancorner.com/

http://www.thevegancorner.com/tags/gluten-free/

http://kblog.lunchboxbunch.com/2012/08/how-i-eat-vegan-and-you-can-too.html

http://www.vegetariantimes.com/recipe/vegan/

http://www.peta.org/recipes/

http://www.vegancooking.com/

http://www.vegancoach.com/vegan-cooking.html

http://www.theppk.com/blog/

http://www.chooseveg.com/

https://www.christinacooks.com/recipes

http://jlgoesvegan.com/recipes-3-2/

http://cookeasyvegan.blogspot.com/

http://holycowvegan.net/

http://www.theveganchickpea.com/p/recipes.html

http://thevegan8.com/

http://www.eatingyoualive.com/

http://www.wortheverychew.com/

https://protectivediet.com/

Proceed with Caution. You are Entering the Wrap Zone!

In my quest for low carb yummies, I am constantly trying to come up with flavorful & pretty things to eat. The visual impact on your palate cannot be ignored! Food should look as good as it tastes (when possible 😉

I believe in quick, easy, simple, healthy and tasty wraps that are a snap to fix!

This is my latest concoction, inspired by by friend, Teresa Winkles, and her low-carb spinach enchiladas.

wrap1

I gathered my ingredients: whole wheat carb chopper tortillas, mozzarella cheese sticks, pepperoni slices, cream cheese, spinach, and Parmesan & Romano shredded cheese, and red pepper flakes….

Spread a heaping teaspoon of cream cheese thinly over your tortilla. Unless you’re still a kid who likes to eat dirt, I recommend that you rinse the spinach and pat it dry before applying it to the cream cheese base 😉

Sprinkle the cheeses and red pepper flakes over the spinach then lay down your pepperoni in a perfectly symmetrical pattern (for my OCD self & friends;)

Place your cheese stick on one side and begin rolling it up, burrito style, tucking in your toppings as you go.

Roll them up then secure the edge with a toothpick.

wrap9

I used my Nuwave oven to heat these wraps because it’s quick, melts the cheese perfectly without over-melting it, and crisps the tortilla too. You can use a toaster oven, conventional oven or the microwave oven, although, you won’t have the crisp crunch with the microwave oven.

wrap10

3 minutes on each side was pert-near perfect for these wraps.

Wait & watch impatiently, while your stomach growls, as your delicious wraps heat. The spinach will wilt to perfection, the pepperoni will be delicious, the cheese will be blissfully bite-able, and the tortilla will obtain the perfect crunchiness!

wrap11

Perfect Spinach & Cheese wrap, from The Wrap Zone!

Special Request Peach Cobbler

Special Request peach cobbler for my mother-in-law
this recipe turned out so good and it’s so easy to make. For my version, I used 3 -12 oz bags of freshly frozen peaches since there were no peaches in the produce department. I tossed them in about 1/3 c. sugar with 2 Tbsp of cornstarch. I followed the rest of the recipe and it took the full 70 minutes to completely bake, and I did cover it loosely with foil for the final 20 minutes to avoid over-browning. Delicious.

cobbler

Crispy Peach Cobbler
Adapted, just barely, from A Boat, A Whale and a Walrus

http://smittenkitchen.com/blog/2015/08/crispy-peach-cobbler/

4 1/2 pounds (about 10 large or 2 kg) peaches, unpeeled, cut into 1-inch chunks or slices (I cut mine each into 8 wedges)
Zest and juice of 1 lemon
4 ounces (115 grams) unsalted butter, softened
2 cups (400 grams) granulated sugar, divided (I reduced this to 1 1/2 cups, and recommend the same)
1 1/2 cups (190 grams) all-purpose flour
2 teaspoons baking powder
1 teaspoon coarse or kosher salt
3/4 cup milk (whole is ideal; almond will work too)
1/2 cup hot water
Heavy cream, cold, for drizzling

Heat oven to 350°F (175°C). Line a rimmed baking sheet with foil, to catch drips, or regret it later.

Prepare the peaches: Place the peaches in a 9×13-inch baking pan and in roughly an even layer. Using a zester or a Microplane, finely zest the lemon evenly over the peaches and then squeeze the lemon juice evenly over the peaches, too, catching any seeds before they fall in.

Make the batter: With an electric mixer, beat butter and 3/4 of the sugar (1 1/2 cups if you use the full amount; 1 cup plus 2 tablespoons if you reduce it as I did) with sugar until sandy, about 1 minutes. Add the flour, baking powder and salt and beat until combined, about 30 seconds, then lower the speed and slowly mix in milk. Continue beating at a medium speed for 2 minutes more, until light and fluffy-ish.

Assemble cobbler: Plop the batter in a large blobs over the peaches. Using my favorite $3.20 kitchen tool, a small offset spatula, or if you don’t have one, a butter knife, carefully spread the batter evenly over the fruit so that it’s no more than 1/2-inch thick in any place. Sprinkle with remaining sugar and drizzle the hot water evenly over the sugar.

Bake cobbler: Place the baking dish on the foil-lined baking sheet and bake for 60 to 70 minutes, until the top is cracked and golden brown, and a toothpick inserted into the topping comes out batter-free. (It’s best to start checking it at 60 minutes.)

Be patient: Let the cobbler sit in the baking dish on a wire rack for at least 30 minutes before serving, which will feel (and smell) like torture, but gives the peach juices a chance to slightly thicken up. To serve, scoop into bowls and drizzle with heavy cream.
http://www.amazon.com/…/B00MB…/ref=dp_byline_cont_pop_book_1